
Showing posts with label Nails. Show all posts
Showing posts with label Nails. Show all posts
Wednesday, March 12, 2014
Shades of Black
I'm feeling a bit down so this mani kind of reflects that I guess. I used a matte black from Zoya (Dovima), a shiny black from Zoya (Raven), and a sparkly PixieDust from Zoya (Dahlia). No top coat or base coat (that defeats the purpose of the matte). I painted all but the ring finger with Dovima. Using a dotting tool, I made different sized dots using Raven. I painted the ring fingers with Dahlia.

Saturday, March 8, 2014
Polynesian Nails
I had NO idea what to call these so I asked hubby what he thought they looked like - he said Polynesian art so I went with that haha!

These have been my favorite nails I've done for awhile and they are also the simplest I've done in awhile!
I used Zoya's Odette on all but the ring finger for a base. On the ring finger I used Zoya's Dot. Then, using Winstonia nail art plate #W111, I stamped the opposite color on the nails (Odette on Dot and Dot on Odette!). I thought the result was beautiful!
Friday, February 28, 2014
Purpley Neutrals
I didn't really know what to name this blog post--there are pinks, purples, glitters, and mauves! All of the colors used are from Zoya. I know the thumb is kind of the odd man out--it's more of a blue tone and the rest are more red toned, but I wanted to use it so by dang I did! There are no rules with nail polish, peeps!! :)

From thumb to pinky I used...Mira, Odette, Brigitte, Lux, and Dot.
I got Dot in my Ipsy bag this month; I believe Odette was the other color they were including in bags and I was truly hoping for that one. But Dot is good too! I've used it in 2 manis now. Lux is one of their new Magical PixieDust polishes and I just love it! It's got really textured glitter and then big chunks scattered throughout! And thanks to my How To Remove Glitter Polish post (nudenailsnotallowed.blogspot.com/2013/12/how-to-remove-glitter-polish-easy-way.html) I don't have to be afraid to rock it!
Which color is your favorite?
Tuesday, January 28, 2014
Love, Hearts, and Lips
I started thinking the other day that Valentine's Day is only a couple weeks away and I haven't done any new V-day nails yet this year! So this marks the first of hopefully many more mani's before then!
I saw these nails on Nails 2 Die For on Facebook--they didn't have the artists name for credit.
I painted the thumbs and pinkies with Zoya's Raven, the pointer and middle fingers with Zoya's Ali, and the ring fingers with Zoya's Purity. Using a dotting tool, I made hearts on the black nails. With XL stamping plate #2 from Shany Cosmetics, I stamped black lips on the pink nails. I used a Sally Hansen nail art pen in black to write "love" on the ring fingers. And I finished it with a top coat of Seche Vite.

I saw these nails on Nails 2 Die For on Facebook--they didn't have the artists name for credit.
I painted the thumbs and pinkies with Zoya's Raven, the pointer and middle fingers with Zoya's Ali, and the ring fingers with Zoya's Purity. Using a dotting tool, I made hearts on the black nails. With XL stamping plate #2 from Shany Cosmetics, I stamped black lips on the pink nails. I used a Sally Hansen nail art pen in black to write "love" on the ring fingers. And I finished it with a top coat of Seche Vite.
Monday, January 27, 2014
Lacquer Legion--January: Reinvention
Soooo, I follow The Nailasaurus on FB, Instagram, and her blog, and she along with a few other bloggers have banded together to give us all prompts each month for nail designs! This months prompt was "Reinvention".
I decided to go for a nail design that represents a caterpillar turning into a butterfly! I'm going to start by telling you the colors so I don't have to type the specific color every single time. The white I used was Essie's blanc, the brown is Zoya's Flynn, the green is China Glaze Highlight of My Summer, orange is China Glaze Peachy Keen, red is Zoya's Lana, and for black I switched between a black nail striper and a black Sally Hansen nail art pen.
Starting with the left hand: Pinky--I started with a white base, then using a dotting tool, I alternated between orange and green spots, drawing them in a squiggly line. Then with my nail art pen, I drew an outline around the dots and drew "hair" on the caterpillars back. Ring finger--I kept it simple and painted it brown. Period. Ha! Middle finger--I alternated orange and green stripes (to look like the caterpillar on the pinky!), then used a nail striper to draw black lines between the colors. Pointer finger--Kept that one simple also with green. Thumb--I started with a white base. Then I drew a "cocoon" with green. Using the nail art pen, I traced around the cocoon, drew a line close to one side, and drew three dots on one side of the line. Using the nail striper, I drew a curved line and a small line to connect the curved line to the cocoon.
Right hand: Thumb--I did a side-to-side ombre nail with the green and orange. To do an ombre nail, paint a stripe of one color on a makeup sponge, then right next to it paint a different colored stripe. Dab the sponge on your nail, moving slightly from side to side to help the color transition (or up and down if you are doing the ombre from top to bottom). Pointer finger--I did a side-to-side ombre nail with orange and red--the thumb and pointer fingers are showing the transition from caterpillar to butterfly! Middle finger--I started with a white base. Then I drew two red dots to make the butterfly wings. Using the nail art pen, I drew the butterfly body and outline of the wings. Using a dotting tool and white, I drew dots on the tips of the wings. Ring finger--kept is simple with brown! Pinky--same idea as the middle finger on the other hand--it's a nail to represent the butterfly from the middle finger! I painted the nail red. Then using the nail art pen, I drew the details of the "wing". Then using a dotting tool and white, I made the dots along the border. I finished everything with a top coat of Seche Vite!
Want to participate in the Lacquer Legion Challenge?? Join the Facebook page--facebook.com/thelacquerlegion You can also follow the girls who created the Lacquer Legion--The Nailasaurus (@thesammersaurus), Rebecca Likes Nails (@rebeccalikesnails), Work/Play/Polish (@workplaypolish), and Chalkboard Nails (@chalkboardnails).
I decided to go for a nail design that represents a caterpillar turning into a butterfly! I'm going to start by telling you the colors so I don't have to type the specific color every single time. The white I used was Essie's blanc, the brown is Zoya's Flynn, the green is China Glaze Highlight of My Summer, orange is China Glaze Peachy Keen, red is Zoya's Lana, and for black I switched between a black nail striper and a black Sally Hansen nail art pen.
Starting with the left hand: Pinky--I started with a white base, then using a dotting tool, I alternated between orange and green spots, drawing them in a squiggly line. Then with my nail art pen, I drew an outline around the dots and drew "hair" on the caterpillars back. Ring finger--I kept it simple and painted it brown. Period. Ha! Middle finger--I alternated orange and green stripes (to look like the caterpillar on the pinky!), then used a nail striper to draw black lines between the colors. Pointer finger--Kept that one simple also with green. Thumb--I started with a white base. Then I drew a "cocoon" with green. Using the nail art pen, I traced around the cocoon, drew a line close to one side, and drew three dots on one side of the line. Using the nail striper, I drew a curved line and a small line to connect the curved line to the cocoon.
Right hand: Thumb--I did a side-to-side ombre nail with the green and orange. To do an ombre nail, paint a stripe of one color on a makeup sponge, then right next to it paint a different colored stripe. Dab the sponge on your nail, moving slightly from side to side to help the color transition (or up and down if you are doing the ombre from top to bottom). Pointer finger--I did a side-to-side ombre nail with orange and red--the thumb and pointer fingers are showing the transition from caterpillar to butterfly! Middle finger--I started with a white base. Then I drew two red dots to make the butterfly wings. Using the nail art pen, I drew the butterfly body and outline of the wings. Using a dotting tool and white, I drew dots on the tips of the wings. Ring finger--kept is simple with brown! Pinky--same idea as the middle finger on the other hand--it's a nail to represent the butterfly from the middle finger! I painted the nail red. Then using the nail art pen, I drew the details of the "wing". Then using a dotting tool and white, I made the dots along the border. I finished everything with a top coat of Seche Vite!
Want to participate in the Lacquer Legion Challenge?? Join the Facebook page--facebook.com/thelacquerlegion You can also follow the girls who created the Lacquer Legion--The Nailasaurus (@thesammersaurus), Rebecca Likes Nails (@rebeccalikesnails), Work/Play/Polish (@workplaypolish), and Chalkboard Nails (@chalkboardnails).
Monday, January 20, 2014
Stiletto Nails with Bows and Bling
I really wanted to try stiletto nails, so I decided today was the day to give it a shot. I did a google search to find a cute design, because, obviously, thats whats going to make the nail!! I found this design from lafemmeclassy.blogspot.com. I didn't have the plastic bows (I ordered some a couple of weeks ago, but they are shipping from HONG KONG!! so who knows when they'll be here lol) so I just decided to paint them on. I used active oval fake nails from Kiss, glued them on, and filed them to be a bit more almond shaped. Then I used fiji from Essie (two coats) on all nails but #4. On #4 I used blanc from Essie. I drew the bow with fiji and traced it with a black nail art pen from Sally Hansen. I added silver rhinestones around the bows. I finished with a top coat from Seche Vite. I really like how they turned out! Let's see if they stay on for longer than a week (I have terrible luck with fake nails!) :)
Thursday, January 16, 2014
Roses and Stripes
I got this nail design from The Nailasaurus (www.thenailasaurus.com) - I thought it was so pretty and girlie!
I started with a black base coat (Raven by Zoya). I made white stripes with a white nail striper (ironic, yes?!) from Shany Cosmetics. With a large dotting tool, I made 3 blue dots on each nail (OPIs Suzi Says Feng Shui). Using a thin nail art brush and a dark blue (Michelle by Julip) I made "shadow" pieces inside the roses. With the same brush, I made highlights with a light blue color (Essie's lilacism - I'm pretty sure it's supposed to be a light purple but I think it could swing either way). Then using a light green (Essie's mojito madness) and the same thin brush, I drew 1-2 leaves on each rose. I finished with a top coat (Seche Vite) and that was that!
This is probably some of the most detailed nail art I've done in awhile but it was just so pretty that I couldn't pass it up :)

I started with a black base coat (Raven by Zoya). I made white stripes with a white nail striper (ironic, yes?!) from Shany Cosmetics. With a large dotting tool, I made 3 blue dots on each nail (OPIs Suzi Says Feng Shui). Using a thin nail art brush and a dark blue (Michelle by Julip) I made "shadow" pieces inside the roses. With the same brush, I made highlights with a light blue color (Essie's lilacism - I'm pretty sure it's supposed to be a light purple but I think it could swing either way). Then using a light green (Essie's mojito madness) and the same thin brush, I drew 1-2 leaves on each rose. I finished with a top coat (Seche Vite) and that was that!
This is probably some of the most detailed nail art I've done in awhile but it was just so pretty that I couldn't pass it up :)
Friday, January 10, 2014
Rock n' Roller!
I dunno about you all, but I LOVE listening to my music! I don't even hardly like driving around the block without it--I may be a little obsessed :S


So it's probably no surprise that my "Rock n Roller" shirt that I bought at Sexy Modest Boutique is one of my absolute favorites! I decided I needed some nails to match!
I started with essie's blanc on all nails but my ring finger--I used Caviar Cocktail by Nailtini on that one. I used a Sally Hansen nail art pen in black to write Rock n Roller and draw notes on my thumbs. I used two different sized dotting tools and Zoya's Giovanna to make dots on my pointer and pinky fingers. I used blanc to make a dot in the larger dot. I used Nailtini's Bloody Mary & a dotting tool to draw the body of a guitar on the middle finger. When that dried I used the nail art pen to draw the border, neck and head, pickups, and knobs on the sides. On the ring fingers, I used a dotting tool to place the nail beads in rows (I applied a clear coat in order to get them to stick).
Be sure to finish with a top coat!
Wednesday, January 8, 2014
Valentines Day Nails
So today I'm going to post a few of the Valentine's Day nails that I came up with last year. I know, I know, it's a little early for Valentine's Day, but more time for you to find something you want to paint on your nails, right?! I will be posting more when it gets closer to the actual day, but here's some early inspiration for you!


On the above manis: The top one I used a pink polish and made a diagonal stripe up the top 1/3 of the nail and filled it in. I used white and a dotting tool to make dots in this space. I then used a silver glitter nail striper to make a border on the bottom of the pink. The bottom one, I painted the pinky-pointer fingers pink and the thumb red. Then using a white nail striper (not easy!! If I did it today, I would use a Sally Hansen nail art pen) I wrote Be Mine. On the other 4 nails, I used a dotting tool to make a set of red lips (hard to see in this photo) and a set of white lips.
 The mani above I actually won a contest for - I was so excited! I used white polish on all nails but the ring finger, which I used a red. I then used an XL image plate from Shany cosmetics (#2) for all the lips, which I used different pinks and reds to stamp the different lip images from the plate. I also used a stamp for the hearts and the "Love" on the thumb. I used a stamp for the heart on the ring finger and added a rhinestone to the center for some glam :)
So for the above nails, I honestly don't remember what specific colors I used, but I think they are pretty self explanatory. Use dotting tools and nail stripers to make the dots/stripes/hearts/lips etc.
I saw the above design on the internet, but I'm not sure of the exact source. If I find it later, I will update this post. Use pink on the pointer/thumb, white on the middle finger, gray on ring and pinky fingers. On the middle finger, use the gray to make stripes, and the pink to make the heart. Pretty simple!
On the above manis: The top one I used a pink polish and made a diagonal stripe up the top 1/3 of the nail and filled it in. I used white and a dotting tool to make dots in this space. I then used a silver glitter nail striper to make a border on the bottom of the pink. The bottom one, I painted the pinky-pointer fingers pink and the thumb red. Then using a white nail striper (not easy!! If I did it today, I would use a Sally Hansen nail art pen) I wrote Be Mine. On the other 4 nails, I used a dotting tool to make a set of red lips (hard to see in this photo) and a set of white lips.
Tuesday, January 7, 2014
Dr. Seuss-ish Nails
I got this idea from Jenny Fox over at polishandpearls.com - for some reason it reminds me of something you would see in a Dr. Seuss book, like where the Lorax might live ;)
I started with a base coat of China Glaze's peachy keen. Then I drew a curved white area with Zoya's Purity. On the opposite side of the nail, I made a curved purple area with Essie's play date. Then toward the bottom, I drew a curved pink area with Essie's sunday funday. I drew the black lines with a Sally Hansen nail art pen after the manicure was dry. I finished it off with a top coat of Seche Vite.
My only complaint with this mani is that the sunday funday was not quite opaque enough to cover play date, so be sure that when you choose colors, you choose ones with adequate coverage or you'll see little borders in the middle!

I started with a base coat of China Glaze's peachy keen. Then I drew a curved white area with Zoya's Purity. On the opposite side of the nail, I made a curved purple area with Essie's play date. Then toward the bottom, I drew a curved pink area with Essie's sunday funday. I drew the black lines with a Sally Hansen nail art pen after the manicure was dry. I finished it off with a top coat of Seche Vite.
My only complaint with this mani is that the sunday funday was not quite opaque enough to cover play date, so be sure that when you choose colors, you choose ones with adequate coverage or you'll see little borders in the middle!
Sunday, December 29, 2013
New Year's Nails
I got this idea from Jenny Fox over at polishandpearls.com - I switched it up just slightly.
For the base: The white is Purity by Zoya and the black is Raven by Zoya.
Pinky and Middle Fingers: I used various nail stripers from Shany Cosmetics to create a firework look (numbers 02[neon green], 03[yellow], 06[magenta], 10[black], 12[gold glitter], 18[blue], 23[orange]).
Ring Fingers: Using the black nail striper, I drew a half circle in the middle of the nail. Using penny talk from Essie and a nail striper brush, I drew a line above the black. Then using the gold glitter nail striper, I traced over penny talk to add some sparkle. I used a black nail art pen from Sally Hansen to draw a "12" on the clock and an arrow for the clock hand. With a dotting tool, I drew dots on the clock with the magenta striper color and the black.
Pointer Fingers: With a dotting tool, I drew dots around the edges of the nail with penny talk and raven. I wrote "2014" with the black nail art pen.
Thumbs: Using a white nail art pen from Sally Hansen, I drew two champagne glasses "clinking" together and a few various sized circles above them. I used Essie's mojito madness and big spender with a dotting tool to give the dots some color. I made the "champagne" with penny talk and the gold glitter striper.
I finished the manicure with a top coat of seche vite. What are your New Year's Resolutions this year??

For the base: The white is Purity by Zoya and the black is Raven by Zoya.
Pinky and Middle Fingers: I used various nail stripers from Shany Cosmetics to create a firework look (numbers 02[neon green], 03[yellow], 06[magenta], 10[black], 12[gold glitter], 18[blue], 23[orange]).
Ring Fingers: Using the black nail striper, I drew a half circle in the middle of the nail. Using penny talk from Essie and a nail striper brush, I drew a line above the black. Then using the gold glitter nail striper, I traced over penny talk to add some sparkle. I used a black nail art pen from Sally Hansen to draw a "12" on the clock and an arrow for the clock hand. With a dotting tool, I drew dots on the clock with the magenta striper color and the black.
Pointer Fingers: With a dotting tool, I drew dots around the edges of the nail with penny talk and raven. I wrote "2014" with the black nail art pen.
Thumbs: Using a white nail art pen from Sally Hansen, I drew two champagne glasses "clinking" together and a few various sized circles above them. I used Essie's mojito madness and big spender with a dotting tool to give the dots some color. I made the "champagne" with penny talk and the gold glitter striper.
I finished the manicure with a top coat of seche vite. What are your New Year's Resolutions this year??
Wednesday, December 25, 2013
Snowflakes, Reindeer, and Polar Bears
I saw this mani on the internet the other day and wanted to try my hand at recreating it!
For the base I used: Zoya's Raven on the thumb and ring finger, Zoya's PixieDust on the pointer and pinky, and Zoya's Purity on the middle finger.
On the thumb, I made a large half-circle using the polish brush and two smaller circles above it with Purity using a dotting tool. I added a smaller circle in the ears with Rimmel's Gray Matter and a dotting tool. Using the same dotting tool, I made eyes and a nose in the half-circle.
On the middle finger, I drew a snowflake using a black Sally Hansen nail art pen, and on the ring finger I used a white Sally Hansen nail art pen to draw a reindeer and polka dots.
On the pinky I used Winstonia nail stamp W112 and Purity. I finished with a coat of Seche Vite--my favorite top coat! Which nail is your favorite?

For the base I used: Zoya's Raven on the thumb and ring finger, Zoya's PixieDust on the pointer and pinky, and Zoya's Purity on the middle finger.
On the thumb, I made a large half-circle using the polish brush and two smaller circles above it with Purity using a dotting tool. I added a smaller circle in the ears with Rimmel's Gray Matter and a dotting tool. Using the same dotting tool, I made eyes and a nose in the half-circle.
On the middle finger, I drew a snowflake using a black Sally Hansen nail art pen, and on the ring finger I used a white Sally Hansen nail art pen to draw a reindeer and polka dots.
On the pinky I used Winstonia nail stamp W112 and Purity. I finished with a coat of Seche Vite--my favorite top coat! Which nail is your favorite?
Saturday, December 21, 2013
Hot Chocolate!
Ever since I bought Zoya's Louise, it has reminded me of hot chocolate. I saw this mani online the other day and had to recreate it!

I started with a base coat of Louise by Zoya. Using a large dotting tool I made rows of large white dots (Purity by Zoya), then used a small dotting tool and made rows of small white dots between the large ones. Then using the same small dotting tool, I made brown dots inside the large white dots.
On the ring fingers, I used a Sally Hansen nail art pen and started by drawing an outline of a heart. Right above that, I drew an outline of an oval. I finished by making a mug shape and filling it in. I topped it all off with my favorite top coat--Seche Vite.
What's your favorite winter drink?
Wednesday, December 18, 2013
Snowflake Gradient Nails
I found the cutest nails by Jenny Fox over at polishandpearls.com and here are the nails I recreated!

I used Zoya nail polish in Cho as a base. Then I used two dotting tools and made the dots by the cuticles using the same polishes listed above. I added a coat of China Glaze's Fairy Dust to give it a little sparkle before adding the top coat.
For the two nails with the gradient I used Cho and also Essie's go overboard. Then I used a white Sally Hansen nail art pen to draw the snowflakes, and covered it with a topcoat to make the nails look very smooth.
Removing Glitter Polish the Easy Way!
I LOVE glitter polish, but I basically quit wearing it for a long time because I absolutely H-A-T-E-D trying to get it off. I would go through pretty much a whole paper towel sheet for each nail (like 10 paper towels to take off a mani!!). And forget cotton balls--there went the whole bag! One day, I was browsing through Pinterest and I found this method for taking off glitter polish (pinned from honeylushy.blogspot.com). I pinned it thinking it was worth a try...if it worked *aaaaaaaa* cue the heavenly chorus! If it didn't, no harm done.


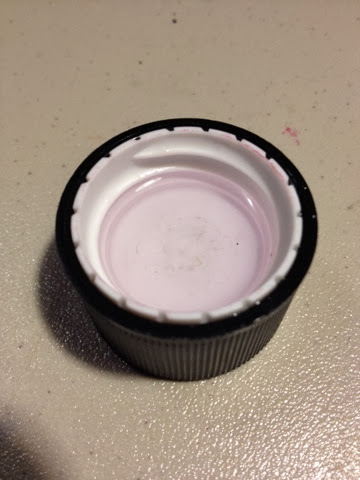


Let me just say, it works SO well! I was ecstatic because I could now wear my beloved glitter polish without bringing out the nuclear bombs to get the stuff back off!
I'll quit blabbering now and show you how to do it--hopefully you find it as helpful as I did!
First, you'll need one of the flat cotton rounds you can find in the beauty section of any drugstore.
You'll need to cut them into as many pieces as you have nails with glitter (I only had 6 with glitter for this example).
Next pour your nail polish remover into its own cap. I like to use acetone based polish remover formulated for natural nails. I just think it takes off the polish much easier.
Dip the first section in the polish remover and squeeze the excess. Place the remover-soaked section on your nail.
Take a small section of aluminum foil and wrap up your nail.
Repeat these steps with each nail that has glitter polish. Let them sit in the foil for 4-5 minutes.
Now, you just twist the foil as if you're rubbing the polish off any other nail.
You may have a couple of small pieces of glitter left, but they can be easily removed! ^^I showed examples of the glitters I removed from the last manicure I posted in the picture above ^^
I hope this post was helpful for you! I know I was so excited to finally wear glitter polish again without the headache of trying to take it back off! :)
Sunday, December 15, 2013
Christmas Sparkles, Snowflakes, and Trees!
I love these nails - they're just so festive! On my pinkies, I used Zoya PixieDust in Tomoko. On my ring finger and thumb, I used a base coat of Nailtini in Bloody Mary, then used Winstonia nail plate in number W120. On the middle fingers, I used China Glaze in Fairy Dust as a base coat, then topped it with NYX nail polish in NPS209 Ice Glitter. On the pointer finger I used KBShimmer Nail Polish in You Autumn Know. Which nail is your favorite?
Saturday, December 14, 2013
Blue Lace
This oldie-but-goodie reminds me of winter because of the two different shades of blue I used. I started with a nude base - ELF nail polish in Nude. I then swooped OPIs What's With the Cattitude from one side of the nail down to the tip of the middle of the nail, then did the same thing on the other side. Then I took OPIs Suzi Says Feng Shui and repeated the last step, leaving a small border of the lighter blue. Using a dotting tool and the lighter blue, I made dots around the edge of the dark blue. Using a white and a dotting tool, I made dots around the edge of the light blue. I finished with a top coat! Simple yet elegant! :) 
Wednesday, December 11, 2013
Ugly Sweater Nails
I painted my nails for the ugly sweater party I'm going to tomorrow. I thought it would be fun to go with ugly sweater nails! They didn't turn out as good as I hoped because my white stripe on the thumb and ring fingers was kind of awkward, but overall I really like them. I used Grey Matter by Rimmel London as a base, Essie blanc for the white, and Nailtini Bloody Mary for the red. I used Shany nail stamp #SH13 for the reindeer, and Winstonia nail stamp #W120 for the rest. I used dotting tools and Sally Hansen's nail art pen in white for the zig zags. Who loves going to ugly sweater parties, and what kind of games do you play at yours??
Snowflakes and Plaid
This has been one of my favorite winter nail art designs. I think it is just so cheery for some reason! I used OPI Nail Lacquer in What's With the Catitude? for the base. I stamped a white plaid design using Mash #39, and stamped a silver snowflake using Shany nail plate #SH17.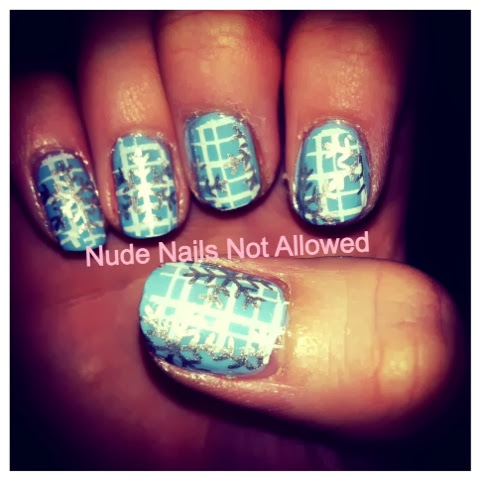
Tuesday, December 10, 2013
Plaid + Snowman
Here's another Christmas-y nail art post for you! I used ELF nail polish in Red Hot, OPI nail lacquer in Green-wich village. The snowman is a nail stamp from Shany #SH01; the plaid is a nail stamp from Mash #50. Only 2 weeks left til Chtistmas! Who's excited? :)
Subscribe to:
Posts (Atom)