Showing posts with label glitter. Show all posts

Tuesday, September 30, 2014

Gradient with Matching Glitter

Words cannot express how much I love this manicure! Seriously. This may be the last mani I ever do, cuz I never want to take this one off! Haha! (It'll be off in a couple of days, we all know 😉). 

I saw this on @chalkboardnails Instagram; you can also find it on her blog! 

I used Sally Hansen Pacific Blue (original formula) and Zoya's Shelby to create the gradient with a makeup sponge. I applied 3 layers, allowing drying time between each. Then I applied two coats of Polish Me Silly's Mr Bubble! If you've never tried Polish Me Silly, you need to check them out right now! They have a shop on Etsy and they hand make all their polishes. They have so many fun colors! After the glitter, I applied a top coat!


Tuesday, July 22, 2014

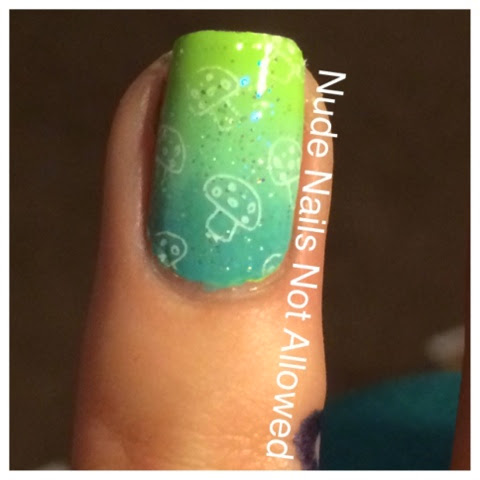
Gradient Shrooms

This evening, to my horror, I realized I have yet to use some of my Nailtini Lacquer Cabinet nail polishes!! *gasp*! So, I decided to fix that!! 

I started with a base coat, then I did one coat of Nailtini Absinthe (designed by Amber Norell). When dry, I used a makeup sponge and painted a strip of Zoya's Rocky, a strip of Nailtini Legitimint (designed by Nail Art 101), and a strip of Absinthe. I dabbed this on each nail, and did two coats of this. Then I painted a coat of glitter polish (I used Pure Ice's Don't You Wish). I added a coat of Seche Vite. When dry, I used a Winstonia nail art plate to stamp these cute little mushrooms on my ring finger nails. 😊 I went over those with another coat of Seche Vite. 


Sunday, June 1, 2014

Glitter and Vines

So these didn't turn out quite like I expected. My silver glitter was fairly translucent and I was hoping it would be opaque. It doesn't show up in the pics very well, but I promise it's there! 

For a base on all but the ring fingers, I used Zoya's Dove, then topped it with China Glaze Fairy Dust. On the ring fingers I used Nailtini Fable Fizz. When those were dry, I used Shany stamping plate SH18 and Essie's Blanc (ring fingers) and Essie's Licorice (all the rest) to stamp a vine-like image. I finished with a top coat of Seche Vite.

I think if I redid this mani, I'd use a Zoya PixieDust rather than the gray polish+the China Glaze glitter. The PixieDust is opaque by itself and always comes out gorgeous! 


Thursday, May 8, 2014

Gradient with Glitter

I was looking through Instagram the other day and @chalkboardnails posted a photo of her nails. She matched her gradient to the colors in her glitter. I thought it was so beautiful so I had to try it out! 

I used Zoya's Robyn, Essie's Licorice, and the glitter is Formula X for Sephora in Turbulence. 

What do you think of this mani??


Monday, March 24, 2014

February Lacquer Cabinet

I was one of the lucky winners to receive a 6 month subscription to 'Tini Beauty's Nailtini Lacquer Cabinet! It includes 3 full sized polishes plus 2 mini bottles so you can mix your own colors!
This ^^ was February's! I just got it today - I guess they were having some problems receiving some of the things that were supposed to be included in the boxes. Anyway, I was super excited to get mine! The dark pinky-purple color is Valentini; the glitter is called Head Over Heels; and the light pink is Pink Clover Club. 

I used the purple on pinky and pointers, the pink on the ring and middle fingers. I used a dotting tool to create the dots at the nail beds. On the thumb, I created a gradient with the purple and the pink, then did a sort of gradient with the glitter also. Then, using Essie's licorice and Mash nail plate #35, I stamped a flower on the ring fingers. I topped it with a coat of Seche Vite.

Go check out tinibeauty.com and sign up for your own lacquer cabinet subscription! It's $25 per month!


Friday, February 28, 2014

Lacquer Legion February - Adoration

The Lacquer Legion prompt for this month was adoration, and if you know me you know I LOVE (adore) shoes! Plus the cheetah print and bows just make them extra girly and cute don't you think?!

I used Zoya's Dot on fingers 1, 4, & 5, and Essie's On A Silver Platter for 3 & 4. I glued a plastic bow on the 4th finger with nail glue. Then using a Sally Hansen nail art pen in black, I drew a stiletto heel on fingers 1 & 5. Using a dotting tool and ELFs Red Hot, I drew hearts. Using a purple Sally Hansen nail art pen, I drew dots on the toes of the shoes to make a little pouf! 

On the 2nd and 3rd fingers, I made dots with Essie's Play Date. Then using a black nail striper, I made random lines around the dots to create a cheetah print. I finished it all with a top coat of Seche Vite. 

What do YOU adore?


Friday, January 24, 2014

Sweet Nails

I'm officially sick of "winter nails" (as well as winter itself!) so I decided to do some spring-y looking nails! On a sponge, I made a stripe of Essie's Play Date, ELFs Bubble Gum Pink, and China Glaze's Peachy Keen. I then dabbed that on each nail, and cleaned up the sides/cuticles. Using Essie's Blanc and Winstonia nail plate #W117 (and of course my Konad stamping kit), I stamped the cupcake, lollipop, and ice-cream stamp. Next I painted a glitter polish over the top to add some sparkle. Finally I finished off with a top coat.

AND if you couldn't tell------MY NAILS ARE STILL ON FROM THE LAST POST!! Hallelujah, it's a miracle! Fake nails generally don't stay on me for more than about 2 days, max, and it's now been 4 days! Twice as long as normal! Yeeesssss!! :D


Sunday, December 29, 2013

New Year's Nails

I got this idea from Jenny Fox over at polishandpearls.com - I switched it up just slightly.

For the base: The white is Purity by Zoya and the black is Raven by Zoya.

Pinky and Middle Fingers: I used various nail stripers from Shany Cosmetics to create a firework look (numbers 02[neon green], 03[yellow], 06[magenta], 10[black], 12[gold glitter], 18[blue], 23[orange]).

Ring Fingers: Using the black nail striper, I drew a half circle in the middle of the nail. Using penny talk from Essie and a nail striper brush, I drew a line above the black. Then using the gold glitter nail striper, I traced over penny talk to add some sparkle. I used a black nail art pen from Sally Hansen to draw a "12" on the clock and an arrow for the clock hand. With a dotting tool, I drew dots on the clock with the magenta striper color and the black.

Pointer Fingers: With a dotting tool, I drew dots around the edges of the nail with penny talk and raven. I wrote "2014" with the black nail art pen.

Thumbs: Using a white nail art pen from Sally Hansen, I drew two champagne glasses "clinking" together and a few various sized circles above them. I used Essie's mojito madness and big spender with a dotting tool to give the dots some color. I made the "champagne" with penny talk and the gold glitter striper.

I finished the manicure with a top coat of seche vite. What are your New Year's Resolutions this year??


Wednesday, December 18, 2013

Snowflake Gradient Nails

I found the cutest nails by Jenny Fox over at polishandpearls.com and here are the nails I recreated! 

I used Zoya nail polish in Cho as a base. Then I used two dotting tools and made the dots by the cuticles using the same polishes listed above. I added a coat of China Glaze's Fairy Dust to give it a little sparkle before adding the top coat. 

For the two nails with the gradient I used Cho and also Essie's go overboard. Then I used a white Sally Hansen nail art pen to draw the snowflakes, and covered it with a topcoat to make the nails look very smooth. 


Sunday, December 15, 2013

Christmas Sparkles, Snowflakes, and Trees!

I love these nails - they're just so festive! On my pinkies, I used Zoya PixieDust in Tomoko. On my ring finger and thumb, I used a base coat of Nailtini in Bloody Mary, then used Winstonia nail plate in number W120. On the middle fingers, I used China Glaze in Fairy Dust as a base coat, then topped it with NYX nail polish in NPS209 Ice Glitter. On the pointer finger I used KBShimmer Nail Polish in You Autumn Know. Which nail is your favorite?

Saturday, December 7, 2013

Snowmen in a Flurry

These nails were inspired by Jenny Fox  over at polishandpearls.com. I used Zoya Nail Polish in Posh - a matte red shade - for the base on 8 of the nails, Essie's blanc for the snowmen and the base on the ring finger, Shanys black nail striper in #10 for the snowmens arms and hats. Then on my ring fingers, I layered two of the Formula X by Sephora polishes to create a sort of snow storm effect. They're the effects top coats in Chaotic and Turbulent. Because the red color is matte, you don't want to put on a top coat or you'll lose the effect! Stay cool lil snowmen!!
 

Wednesday, December 4, 2013

Penguins!

My sister-in-law sent me a link for penguin nails (the watermark on them is Painting Outside the Lines), and they were too cute--I had to try them out! I used Zoya's Dream for the ring finger, then layered Formula X from Sephora in Hyperactive over that; I used Shany's nail stamp SH17 & Essie blanc for the snowflake. The penguins are in Essie licorice & Essie blanc; I did their beaks and feet using Shany nail striper #23 and made their eyes with dotting tools. These just make me happy when I look at them throughout the day :)